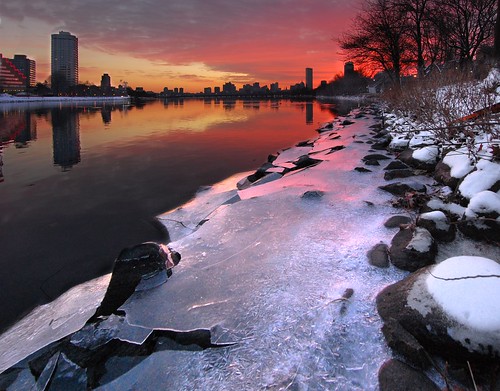
I took this shot Saturday morning. The colors in the sky appear exactly as they came off the camera, no trickery necessary. But they only lasted for about a minute. Timing, again, is everything!
The dynamic range in a scene like this is too big to capture with a single exposure. You either capture the beautiful sky and leave the land dark, or capture the land and wash out the sky. Before digital came along, you would have had to mess with graduated neutral density filters to balance the light and dark parts. But now we can do it in software. Entirely free software, in fact. What you see before you is actually a blend of two shots, both taken hand-held. Here are the two originals (mouse over to see the difference... if you're reading on Facebook or via RSS, come here to see it):

Notice that the images don't line up exactly. You could avoid this problem by using a sturdy tripod and taking care not to bump the camera between shots, but we can also solve this problem with software. First I used autopano-sift to identify control points. Control points are features that appear in both images. Then I loaded the images and control points into Hugin, where I added a few more control points by hand (experimentation proved that they were necessary for a good fit). Here's the set of control points I used:
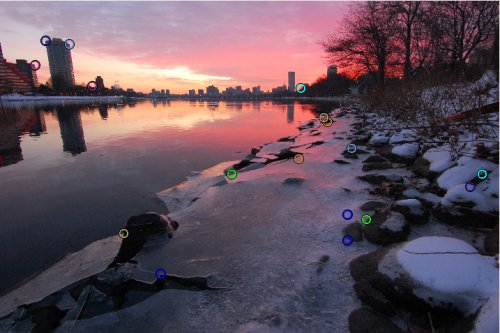
Hugin can also correct lens distortion effects. Notice how the skyscraper on the left (Tang Hall -- I used to live there) seems to lean to the left, while the skyscrapers in the distance are leaning slightly to the right. We can fix this by adding horizontal and vertical control points that tell Hugin which lines need to be straight.
Then you tell Hugin to go and it sits and ponders for awhile, ultimately producing two new images that line up nicely, and with the distortion mostly corrected (mouse over to compare):

Next I opened the images in GIMP and put each on its own layer, the light one on top of the dark. I created a layer mask for the lighter image and painted on it to mask out the parts of the light image that were too light, allowing the better colors on the layer below to shine through (mouse over to see the difference):

Then I added another layer, set its mode to "Dodge", and painted over the foreground using paintbrush and gradient tools to bring more detail out of the shadows. I probably could have skipped this step if I had exposed the bright image even brighter at the start. I also desaturated a slight blue cast out of the snow. Finally, I had to crop it down to make it rectangular again, and I used the clone tool on the upper left corner to fill in a little extra space, giving my crop more room.
Exposure blending allows you to produce images beyond the capabilities of your camera. To see some outstanding examples, check out DanielKHC's Digital Blending set on Flickr.
3 comments:
Nice work.
wow. how things have changed. great shot.
Thhis was great to read
Post a Comment